Basic Git & GitHub for DevOps Engineers
Day 8 : #90DaysOfDevOps Challange
What is Git?
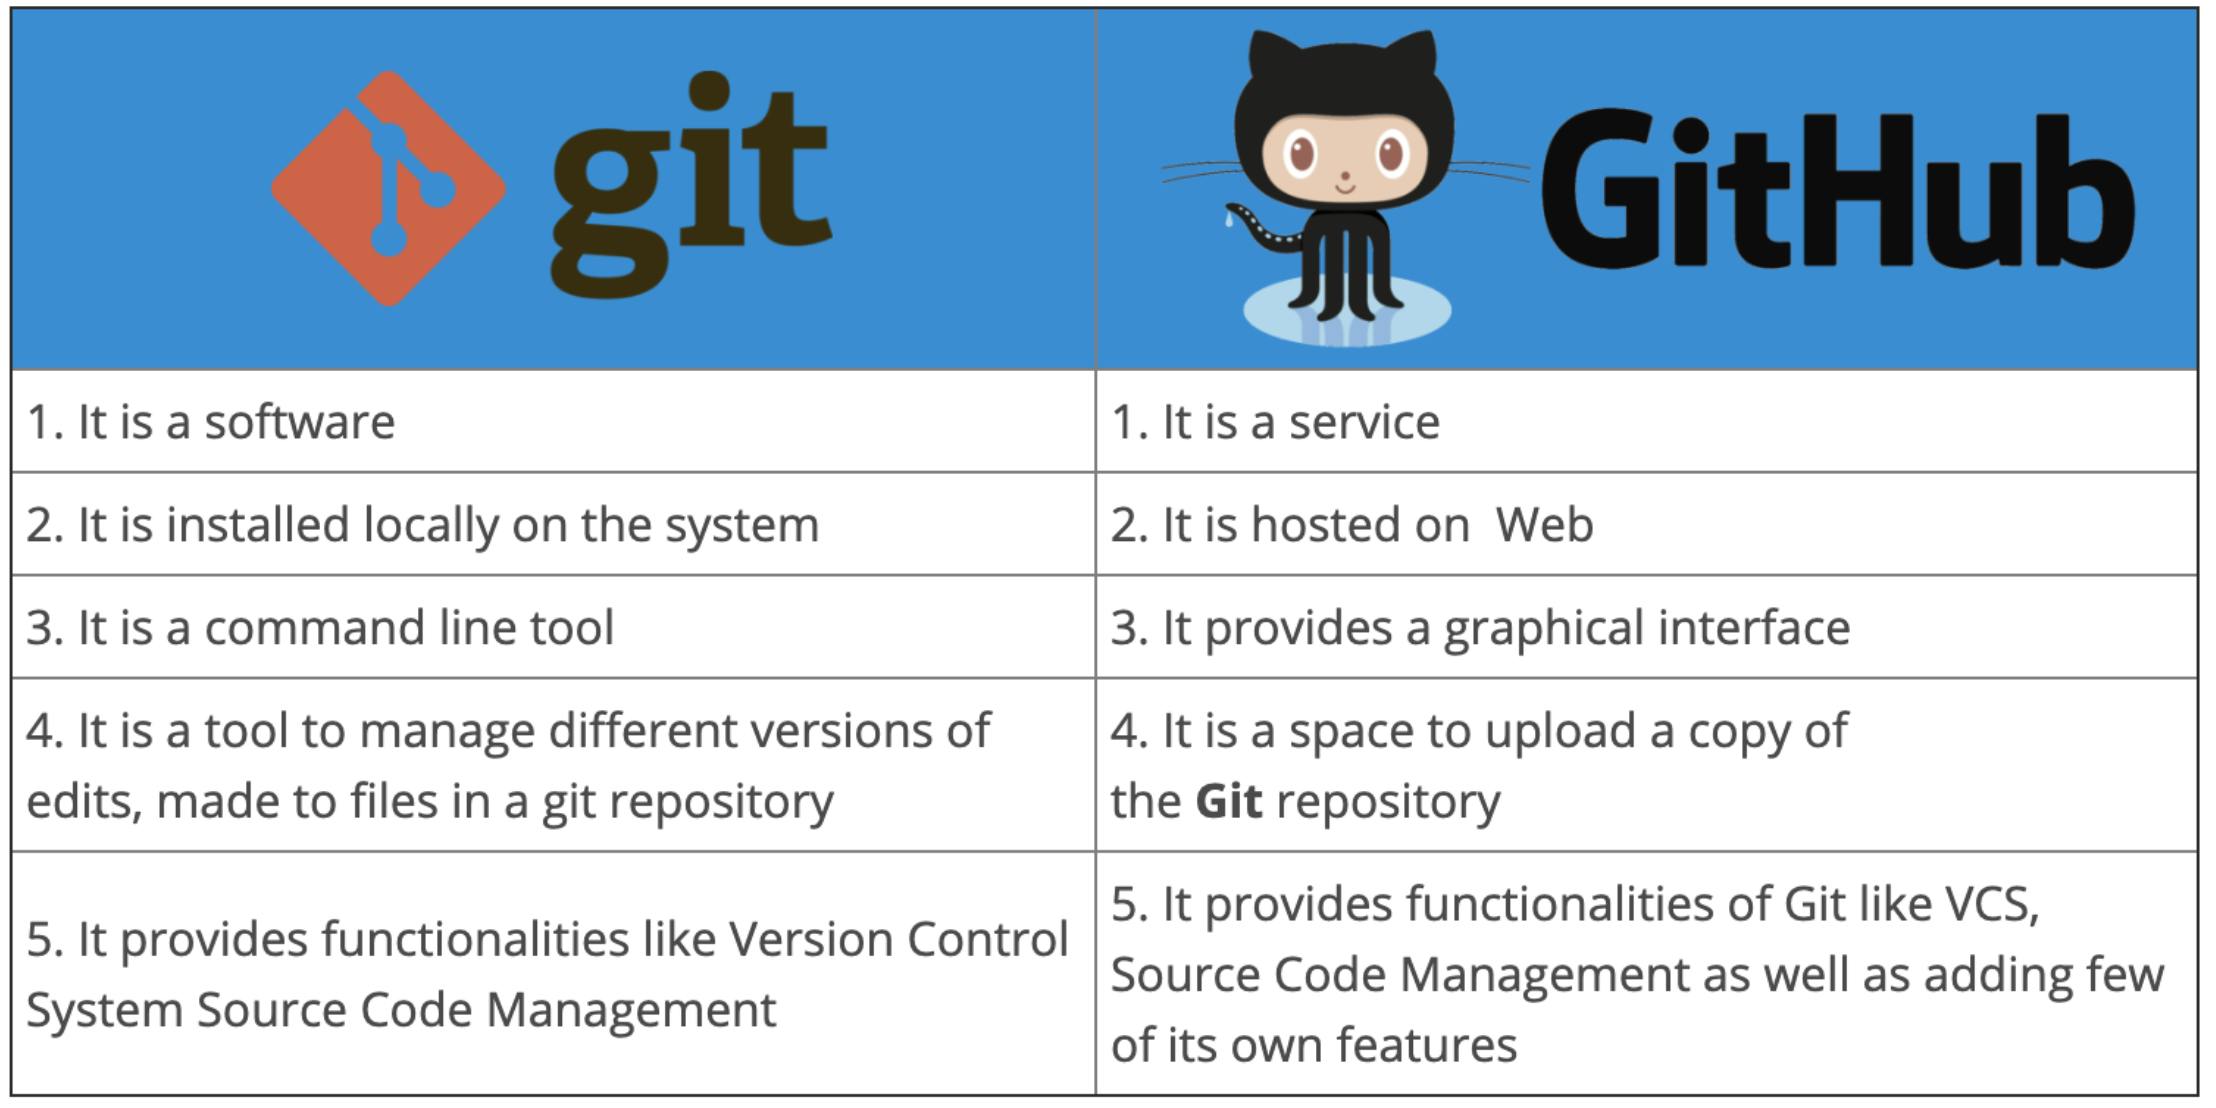
Git is a version control system designed for tracking changes in source code during software development. It was created by Linus Torvalds in 2005 to manage the development of the Linux kernel. Git provides a distributed and decentralized way of managing software development, allowing multiple people to work on the same project simultaneously.
With Git, developers can keep track of changes made to code, collaborate with other developers on a project, and revert to earlier versions of code if necessary. Git also makes it easy to create separate branches of code for different features or versions of a project, merge those branches together, and manage conflicts that arise when changes are made to the same piece of code by multiple developers.
Git has become the default standard for version control in software development and is widely used by developers and organizations of all sizes.

What is GitHub?
GitHub is a web-based platform that provides hosting for version control using Git. It is a subsidiary of Microsoft, and it offers all of the distributed version control and source code management (SCM) functionality of Git as well as adding its own features. GitHub is a very popular platform for developers to share and collaborate on projects, and it is also used for hosting open-source projects.
GitHub allows users to create and manage public or private repositories, where they can store their code and collaborate with other developers. Users can also contribute to existing projects by submitting pull requests or opening issues to report bugs or suggest new features.
In addition to code repositories, GitHub also provides features such as wikis, project management tools, and code review tools. It also offers integrations with other development tools and services, such as continuous integration and deployment services.
What is Version Control? How many types of version controls do we have?
Version control is a system that tracks changes to a file or set of files over time so that you can recall specific versions later. It allows you to revert files back to a previous state, revert the entire project back to a previous state, compare changes over time, see who last modified something that might be causing a problem, who introduced an issue and when, and more.
There are two main types of version control systems: centralized version control systems and distributed version control systems.
A centralized version control system (CVCS) uses a central server to store all the versions of a project's files. Developers "check out" files from the central server, make changes, and then "check in" the updated files. Examples of CVCS include Subversion and Perforce.
A distributed version control system (DVCS) allows developers to "clone" an entire repository, including the entire version history of the project. This means that they have a complete local copy of the repository, including all branches and past versions. Developers can work independently and then later merge their changes back into the main repository. Examples of DVCS include Git, Mercurial, and Darcs.

Why do we use distributed version control over centralized version control?
Better collaboration:- In a DVCS, every developer has a full copy of the repository, including the entire history of all changes. This makes it easier for developers to work together, as they don't have to constantly communicate with a central server to commit their changes or to see the changes made by others.
Improved speed:- Because developers have a local copy of the repository, they can commit their changes and perform other version control actions faster, as they don't have to communicate with a central server.
Greater flexibility:- With a DVCS, developers can work offline and commit their changes later when they do have an internet connection. They can also choose to share their changes with only a subset of the team, rather than pushing all of their changes to a central server.
Enhanced security:- In a DVCS, the repository history is stored on multiple servers and computers, which makes it more resistant to data loss. If the central server in a CVCS goes down or the repository becomes corrupted, it can be difficult to recover the lost data.
Overall, the decentralized nature of a DVCS allows for greater collaboration, flexibility, and security, making it a popular choice for many teams.
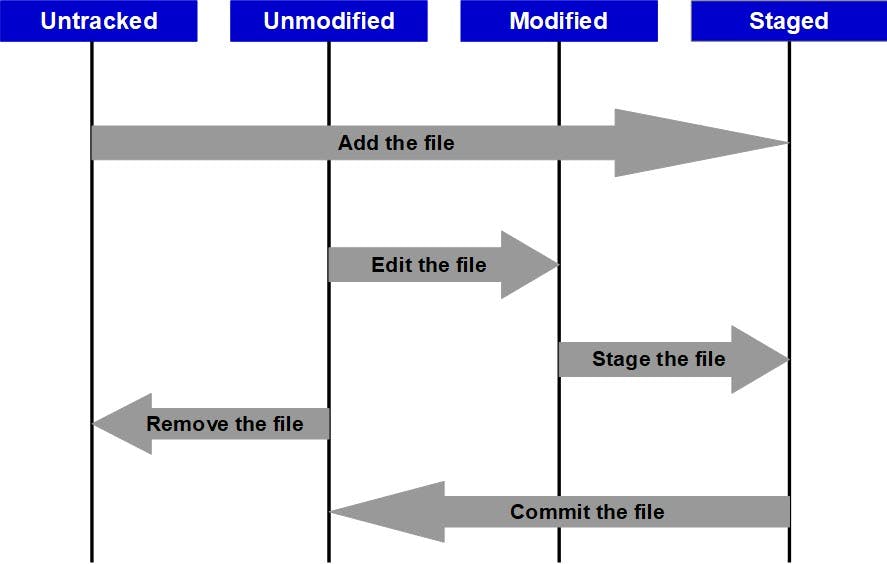
Git Workflow
Modify the files in your working directory.
Move the files to the staging area by staging them – adding snapshots of them to your staging area.
Commit, which takes the files in the staging area and stores that snapshot permanently to your Git directory.
Git generates a unique ID which is a 40-character string of hex digits for each commit and refers to the commits by this ID rather than the version number
Some Important Terms here are:-
Repository — A repository is a place where you have all your code. You can think of it as a folder on the server. It is kind of a folder related to one product. Changes are personal to that particular repository.
Server — It stores all repositories and contains metadata as well.
Working Directory — This is where you see the files physically and do the modifications.
Commit — It stores changes in the repository. You will get an alphanumeric commit ID.
Tags — Tags assign a meaningful name with a specific version in the repository.
Push — Push operations copy changed from a local repository server to a remote/central repository. This is used to store the changes permanently in the Git Repository.
Pull — Pull operation copies the changes from a remote repository to a local machine. The pull operation is used for synchronization between the repository.
Exercises:
- Install Git on your computer
By default is already installed git in Linux machine
we can check the version
git --version
If it is not installed then need to run the following command
sudo apt-get install git
- How to create a new repository on GitHub and clone it to your local machine?
Here are the steps to create a new repository on GitHub and clone it to your local machine:
Sign in to your GitHub account and click on the “+” icon in the top-right corner of the screen. Then, select “New repository” from the dropdown menu.
Give your repository a name and optionally add a description.
Choose whether to make your repository public or private and select any additional options you want for your repository.
Click on the “Create repository” button to create your new repository.
Once your repository is created, you can clone it to your local machine.
Open a terminal window and navigate to the directory where you want to clone your repository.
Go to your repository on GitHub and click on the “Code” button, then copy the repository URL.
In your terminal window, enter the following command to clone your repository:
git clone <repository URL>
Replace “<repository URL>” with the URL you copied from GitHub.
8. After cloning your repository, navigate into the newly created directory using the command:
cd <repository name>
Replace “<repository name>” with the name of your repository.
9. You can now start working with your repository on your local machine. Any changes you make can be committed and pushed back to your GitHub repository using Git commands.
That’s it! You’ve successfully created a new repository on GitHub and cloned it to your local machine.
3. Make some changes to a file in the repository and commit them to the repository using Git.
Open the file you want to edit in a text editor on your local machine.
Make the changes you want to the file.
Save the changes to the file.
Open a terminal window and navigate to the directory for your repository using the command:
cd <repository name>
Replace “<repository name>” with the name of your repository.
05. Check the status of your repository using the command:
git status
This will show you the changes you’ve made to the file.
6. Add the changes you’ve made to the file to the staging area using the command:
git add <filename>
Replace “<filename>” with the name of the file you’ve edited.
7. Commit the changes to your repository using the command:
git commit -m "Your commit message here"
Replace “Your commit message here” with a short, descriptive message about the changes you’ve made.
8. Push the changes to your GitHub repository using the command:
git push origin main
This will push the changes to the “main” branch of your GitHub repository.
9. Enter your GitHub username and password when prompted.
10. That’s it! You’ve successfully made changes to a file in your repository and committed them using Git.
Thank you for reading!!!
~Bhaarat


